


How to Repair Scratches on 18th Century Wood
Last Updated: November 4, 2026
Quick Summary
To repair scratches on 18th century wood, first test whether the damage sits in the finish or the wood with a fingernail and solvent swabs in a hidden spot, then clean, dry, and photograph the area. Blend light scratches with wax or shellac, fill deep ones only with reversible period materials, and never sand veneer, inlay, or carving.
- A scratch that disappears when wetted is in the finish; one that stays visible is in the wood.
- Test finishes with denatured alcohol, lacquer thinner, and mineral spirits on separate swabs in hidden spots.
- If you sand at all, start at 320 grit or higher and always sand with the grain.
- Beeswax and resin fill sticks suit shallow dents in waxed or oiled finishes and lift out with mineral spirits.
- Call a conservator when a scratch crosses veneer, inlay, or carving, or the finish is flaking widely.
Table of Contents
- Why 18th Century Wood Demands a Different Approach
- How to Tell If the Scratch Is in the Finish or the Wood
- How to Fix Scratches on Antique Furniture: Step-by-Step
- How to Fill In Scratches on Wood: Matching Historic Materials
- How to Repair Deep Scratches in Wood Furniture Without Losing Character
- Best Furniture Polish for Scratches: What to Use and What to Avoid
- When to Stop and Consult a Furniture Conservator
- Finding a Period Piece Worth Caring For
- Frequently Asked Questions
Why 18th Century Wood Demands a Different Approach
A scratch on a modern table is an annoyance. A scratch on an 18th-century piece is a decision point.
Pieces dating back to the 16th century are often over-restored by well-meaning owners who treat an antique like new furniture.
Original finish is the single most valuable thing on a period piece. A thin, dark, hand-rubbed surface carries age no reproduction can copy.
Conservation-First Repair for 18th-Century Furniture
Conservation-first repair means you stop the damage and leave everything else alone. You do not make the piece look new. You make it stable, readable, and honest.
Here is the mindset shift:
- Preserve original material first. Every swipe of sandpaper removes wood that cannot be replaced.
- Do the least possible. A stable but visible scratch is often better left alone.
- Reversibility matters. Any treatment you add should be removable later by a conservator.
For a deeper look at the wider care routine these pieces need, see our guide on how to care for 18th century wood furniture.
How to Tell If the Scratch Is in the Finish or the Wood
The most important question in any scratch repair is simple: is the damage in the finish or in the wood? The answer decides whether you clean, blend, fill, or stop entirely.
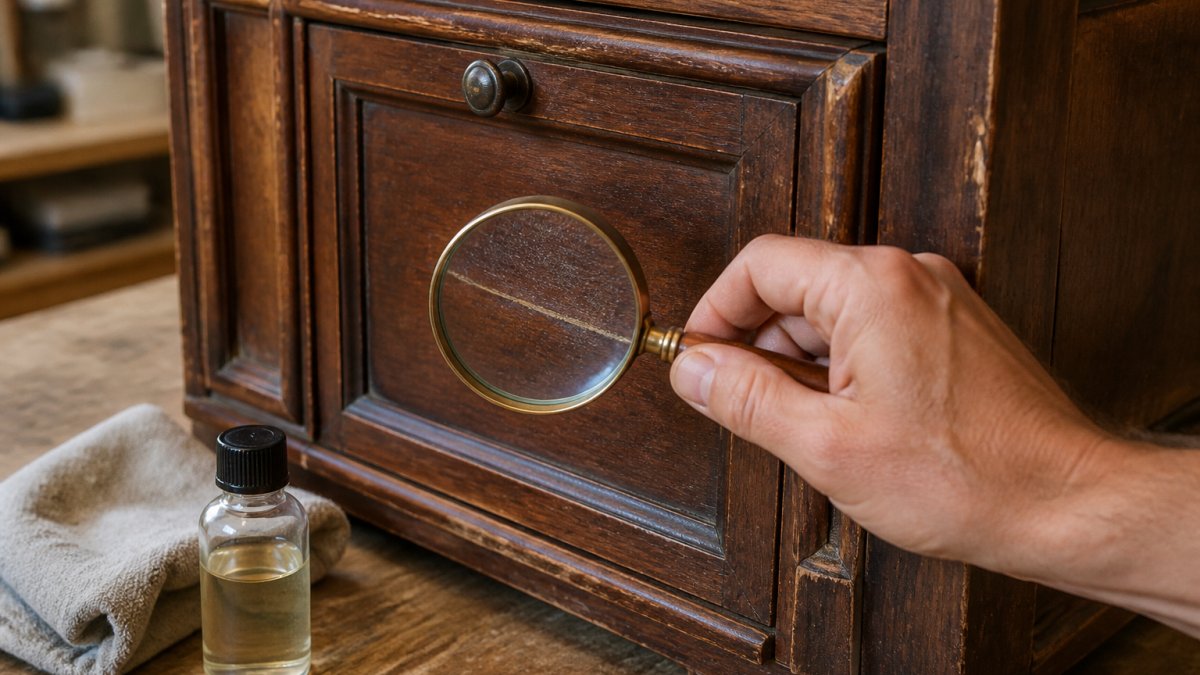
Run a fingernail gently across the scratch. If your nail glides over it, the damage sits in the topcoat. If your nail catches or drops into a groove, the wood fibers are cut.
Identifying the Finish Before Treatment
You cannot fix a finish you cannot name, and on a piece this old you cannot assume the finish you see is original.
Work through this decision sequence in a hidden spot, such as the inside of a drawer, the back edge of a leg, or the underside of a rail:
- Look first. Wax looks dull and slightly cloudy and shows fingerprints. Shellac has a warm, glossy film that crazes into fine cracks with age. Oil-and-varnish blends sit semi-gloss and darken unevenly. A hard, glassy, perfectly even film is usually 20th-century lacquer or polyurethane.
- Rub with a dry cloth. Wax smears or buffs to a shine. A hard film will not move.
- Test with denatured alcohol on a cotton swab. Shellac softens within seconds and the swab picks up color. If nothing happens, the film is likely varnish, lacquer, or polyurethane.
- Test with lacquer thinner on a separate swab. Lacquer softens; polyurethane and most varnishes resist. Keep the swabs apart so you do not confuse results.
- Test with a few drops of mineral spirits. Wax dissolves; most other films do not.
Record what you find.
Watch out: testing on a visible surface can lift color and leave a pale spot you cannot hide, and alcohol will cut straight through shellac, so never test on a French-polished show surface.
Distinguishing Finish Scratches from Wood Scratches
The fingernail test tells you depth, but not what to do. Use this rule set:
- White or light-colored scratch that vanishes when wetted: the film is fractured but the wood is intact. This is a finish-blend or wax job, not a fill.
- Scratch that catches a nail but shows no raw wood: the film is cut through to the wood surface. A thin coat of shellac or wax can often seal it without filler.
- Scratch with visible raw, lighter wood in the bottom: the wood fibers are cut. This is the only case where filling is appropriate, and only if the piece is not veneered.
A scratch that looks deep under grime often turns out to be shallow once clean, so clean and dry the area before you make the call. If the finish is flaking, cloudy, or lifting across a wide area rather than in one line, the problem is the coating itself, not the scratch, and that is a conservator's decision.
The fingernail test and a few solvent swabs tell you what you are dealing with before you touch the surface.
| Test | What to do | What the result means |
|---|---|---|
| Fingernail | Run a nail gently across the scratch | Glides over: damage in topcoat; catches: wood fibers cut |
| Wetting | Wet the scratch and watch | Disappears: in the finish; stays visible: in the wood |
| Dry cloth | Rub with a dry cloth | Wax smears or buffs; a hard film will not move |
| Denatured alcohol | Test on a cotton swab in a hidden spot | Shellac softens within seconds and picks up color |
| Lacquer thinner | Test on a separate swab | Lacquer softens; polyurethane and most varnishes resist |
| Mineral spirits | Apply a few drops | Wax dissolves; most other films do not |
How to Fix Scratches on Antique Furniture: Step-by-Step
Here is the safe sequence for light to moderate damage. Work slowly, and stop at any point where the wood starts to look different from its surroundings.
- Clean the area. Wipe with a cloth dampened with mild soap and water. Lift out grit from the scratch.
- Dry fully. Let the surface air dry for at least an hour before any treatment.
- Photograph the damage. Shoot the scratch straight on and at an angle, with a ruler for scale.
- Test in a hidden spot. Confirm your chosen product will not lift color.
- Blend, do not scrub. Work along the grain with a soft cloth and a small amount of product.
- Reassess. If the scratch is still visible, decide whether a fill is worth the risk.
Cleaning, Drying, and Documenting the Damage
Use a soft cloth. Keep water minimal around veneer edges and joints. Then let the piece sit.
Documentation is not busywork. A dated photo set protects the piece's value and gives a conservator a clear record if you later hand the work over.
Light Sanding Along the Grain
Light sanding is where most home repairs go wrong. It removes original material, and on an 18th-century surface, that material is irreplaceable.
If you sand at all, follow these rules:
- Use the finest grit that will do the job, starting at 320 grit or higher.
- Sand with the grain, never across it.
- Use a light touch and check progress every few strokes.
For most period pieces, a light rub with a fine abrasive pad followed by a wax coat is safer than sandpaper. If the finish is shellac or wax, a conservator can often re-amalgamate the surface instead of abrading it.
How to Fill In Scratches on Wood: Matching Historic Materials
Filling a deep scratch means adding material, and added material always shows if the color or sheen is wrong. On an 18th-century piece there is a second rule that matters more than color match: whatever you add must be removable later without damaging what is underneath.
Antique Cabinet, Storage, Continental Renaissance, 18th C., 1700's, Handsome!! →
Match the fill to the piece, not to a hardware store color chart. The right material depends on what the finish is and how deep the cut goes.
Period-Appropriate Fill Materials
- Beeswax and resin fill sticks. The traditional choice for shallow dents and small gouges in waxed or oiled finishes. They stay soft, can be tinted with dry pigment, and lift out with mineral spirits if the repair needs to be redone.
- Shellac sticks. Melted into the scratch and leveled flush, these suit shellac surfaces because they bond chemically to the surrounding film and can be re-amalgamated later. They are the closest thing to a reversible fill on a French-polished piece.
- Tinted wax blended from neutral wax and dry pigment. This gives the closest color match on dark woods because you build color in layers rather than committing to one shade. Use earth pigments, not artist acrylics, which dry hard and cannot be reversed.
Color match matters more than texture. Build color in thin layers rather than one heavy application, and check the match under the same light the piece will live in.
Watch out: a fill that sits proud of the surface will catch light and draw the eye to the repair, so level it flush with a scraper or a cloth-wrapped block rather than sanding around it.
Filling Without Losing Character
The goal is not invisibility. The goal is a repair that reads as age, not as an accident. A deep scratch that has darkened with dirt often improves dramatically after a careful clean and a thin coat of wax, and that may be enough.
Seeing an authentic piece helps enormously here. A period example like this large neoclassical marquetry bureau secretaire shows the depth of color and the fine veneer work you are trying to match, which is far more useful than a swatch book.
How to Repair Deep Scratches in Wood Furniture Without Losing Character
Start with the least invasive option. A deep scratch that has darkened with dirt often improves dramatically after a careful clean and a thin coat of wax.
Watch out: aggressive stain pens and dark wax crayons create a hard, flat line that looks worse than the original scratch under good light.
A provincial carved oak hall stand is a good reference point.
Veneer, Marquetry, and Carved Surfaces
Veneer changes the rules completely. The visible surface is a thin slice of precious wood glued over a substrate, and it is often less than a millimeter thick.
- Never sand veneer. You will cut through it in seconds.
- Never flood it with water. Moisture lifts veneer and swells the substrate.
- Never press hard on marquetry. Inlay sits at slightly different heights and can crack.
A Louis Philippe mahogany marquetry secretary desk shows exactly the kind of inlaid surface where a home repair can do real harm. On pieces like this, professional assessment is the safer call.
Best Furniture Polish for Scratches: What to Use and What to Avoid
The best polish for a scratched antique is a simple wax, not a tinted miracle product. A thin coat of clear furniture wax fills minor surface scratches, adds a soft sheen, and stays removable.
What works:
- Clear paste wax, feeds the surface and hides fine scratches.
- Mineral oil, safe on oiled finishes, applied sparingly.
- Walnut or pecan rubbed on light scratches, a traditional trick for dark woods, used lightly.
What to avoid:
- Silicone-based polishes, which are hard to remove and complicate future conservation.
- Tinted "scratch remover" pens on period finishes.
- Harsh household cleaners and abrasive creams.
When to Stop and Consult a Furniture Conservator
Stop and call a conservator when the piece is valuable, the damage is structural, or your test results are unclear. A conservator preserves original material rather than making the piece look new.
Call one when:
- The scratch crosses veneer, inlay, or carving.
- The finish is flaking, cloudy, or lifting across a wide area.
- The piece has documented provenance or high value.
A fine Georgian carved oak grandfather clock is exactly the kind of piece where a home repair can cost more than it saves. Professional conservation protects both the object and its value.
Finding a Period Piece Worth Caring For
Good repair starts with a piece worth the effort. Authentic 18th-century furniture rewards careful ownership in a way reproductions never do.
What to look for:
- Original finish in reasonable condition, even if worn.
- Honest wear that matches the piece's age.
- Sound joinery with no major structural repairs.
Old Europe Antique Home Furnishings offers a curated selection of European antiques dating back to the 16th century. The showroom is available for viewing by appointment.
Frequently Asked Questions
Does WD-40 take scratches out of wood?
No. WD-40 is a lubricant and solvent, not a scratch remover. On 18th-century wood it can dissolve original wax or shellac and leave an oily residue that darkens the surface unevenly. For surface scratches, a tiny amount of mineral oil or a walnut rub is safer. Reserve WD-40 for metal hardware, never the finished wood itself.
Can vinegar and olive oil be used to repair scratches on 18th-century wood?
Vinegar and olive oil is a common DIY mix, but it is risky on period furniture. Vinegar is mildly acidic and can dull a shellac or varnish finish over time; olive oil turns rancid and attracts dust. If you want to darken a light scratch, try a crushed walnut or a drop of mineral oil first, and test any mixture on an inconspicuous spot before applying it broadly.
Should you sand scratched 18th-century furniture?
Only as a last resort and only with very fine grit, such as 320 or higher, along the grain. Sanding removes original finish and patina, which lowers both historical and monetary value. For most surface scratches, start with cleaning and a color-matched fill or oil rub. If the scratch is deep or the finish is fragile, consult a furniture conservator before touching sandpaper to the piece.
How do you repair a deep scratch in antique wood?
Clean the area and let it dry fully. If the scratch is in the finish only, a thin coat of shellac or a matching wax stick can blend it. If raw wood shows, apply a color-matched filler or a shellac burn-in stick, then level it gently with 320-grit paper along the grain and polish. For veneer or carved pieces, stop and get a conservator's assessment first.
The difference between a repair that protects an antique and one that damages it comes down to restraint. Start with the gentlest option, document everything, and stop when the piece deserves an expert. Browse our collection at Old Europe Antique Home Furnishings to find a period piece worth caring for, or contact us to arrange a showroom visit and see the craftsmanship up close.
